4 Quick steps to create new Top navigation menu with categories and some custom items in cs-cart
Hello dear readers.
We continue talking about cs-cart.
The last article was about how to create your own theme in cs-cart. –
“3 quick steps to create your own theme in cs-cart-4.0.3”
In today’s post we’ll learn how to create the new top navigation menu in categories, some custom items.
So let’s start.
Sometimes you need to have some additional items in the Top menu on your website. These items can be linked with some of existing pages or even with some new pages on your site. Making some custom drop-down menus under custom items can also be useful. Fortunately cs-cart template includes functionality to do all of this:
- • additional pages
- • additional menus with custom items
- • custom drop-down menus etc
So, let we show you how this can be done in the quick and easiest way step by step.
How to add an additional page
At first, let’s add an additional page which will have its own unique link to your website.
Go to admin in the top menu: Website_› Content_›press button “+” and choose Add page.


Ok, after that all next steps can be done in a simple and quick way.


You can add as many pages as you need. You can also set the sort order for them.
How to add new own menu
Go to Design -> Menus.
In default cs-cart you will see only one additional menu “Quick links”. Ok. But we want to create own original menu which is not similar to anything existing.
So, press symbol “+” Add menu. Write menu title and save.
How to add the additional items in the custom menu
Ok, now our menu is empty and we want to add some new items.


Press “+” Add item. At least one item of our menu has to be of Root Level. After that we can create other sub items under this top one. We may also make menu only with the top level items.
Ok, suppose we want to create this top item linked with some external link and under its sub menu with the link to our additional page. Let’s fill the fields in like on the screen and press “Create”.


Press the “+” button again. Now let’s add sub item linked with the new custom page.
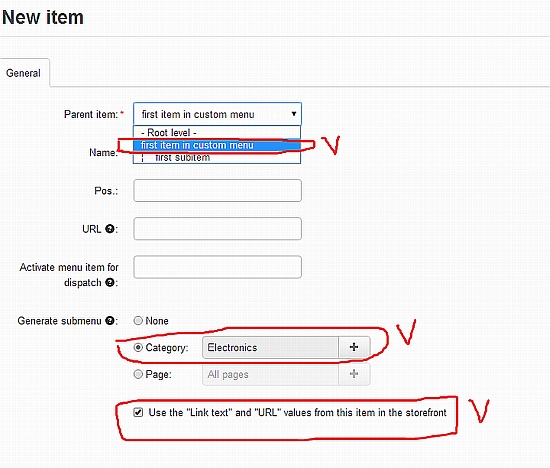
Here, in the “Parent item” field, you should choose our first top item of the menu.
In the field “Generate submenu” we need to choose “Page” and choose our new page in poup window. Connecting the sub item with our page via link is also the important thing. To do this you need only to check the bottom item.


The other important thing, which can be useful for your new menu is displaying of existing categories of your site.
Ok, what do we need to add new category?
We need to do the same procedure of the new item’s adding. But in popup window, in the field “Generate submenu”, choose “Category”. In categories popup window choose any category. Don’t forget to check bottom checkout box also.

Ok, if you’ve done all as were described above, you will see the such menu.


Here you can change the sort order of items, if you need.
Ok, but the FrontEnd still has the standard cs-cart menu. So, let’s go to the last step.
How not to see the default menu and add custom menu to layout
Go to Design -> Layouts ->. Then choose Default layout. You can see block Top menu in it.
So, we need to disable it (it would be good practice to not press Delete block, because maybe you will want to see it again. Better to disable it.).


The last action – to add custom menu.
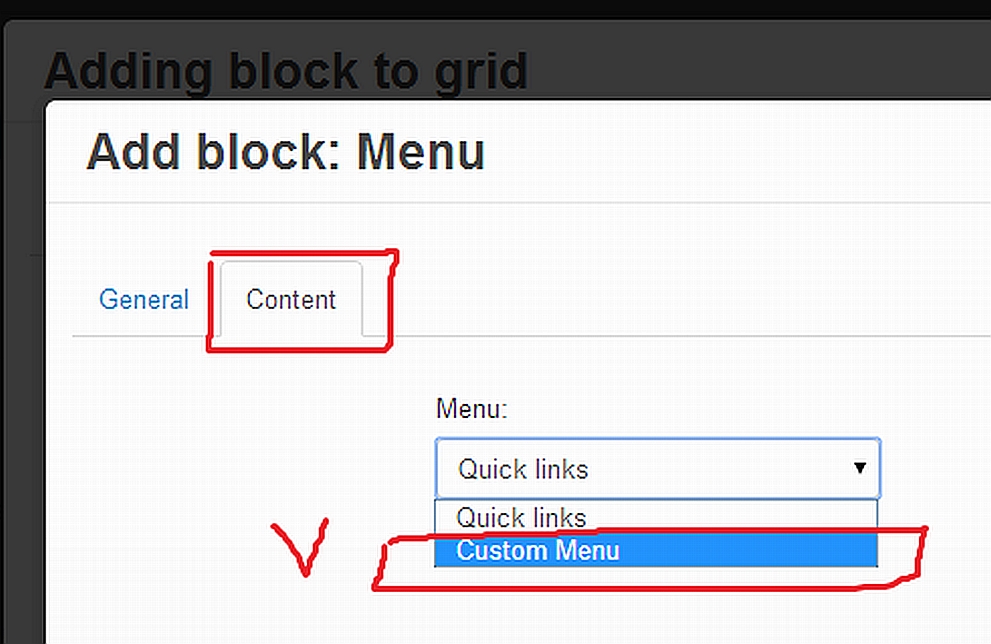
Add a block in the GRID of default menu.


In popup window choose second tab “Create New Block” -> Menu.


In next popup window in the tab “Content” choose created custom menu.

All done! You can see such menu and can enjoy using it.
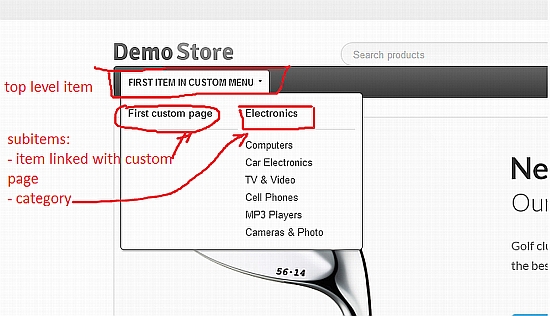

We have shown how to edit one custom item and one category. But you can add categories as other top level items and many additional items which can be linked with existing pages on your site, categories or some external links.
So, good work!