How to install Joomla Computer Repair website template of 3.1 version
Hello dear readers.
Today we begin to publish a series of articles devoted to installation and optimization of a website, which is created on the base of the finished template “Computer Repair Joomla 3.1”
Let’s start with the installation
The instructions, which are given below, describe the installation of the Joomla and the website template itself.
Ok. We should find the “Readme” document in the zip that includes the template’s files.

Open the text and read the instructions that are referring to installation and editing.
We should, according to the first item, upload the archive with the Joomla 3.1 from the official website www.joomla.org

Upload the archive by click on the shown link.
After that we should upload the archive to our server and unzip it.
Let’s illustrate this with an example.
We create a new folder “Computer_repairJoomla3.1” for our future website. It is actual for our case, since we will upload the Joomla3.1 files and the template’s files on the test server.

Now we upload the Joomla_3.1.5-Stable-Full_Package zip archive to our folder and unpack it with the help of the File Manager.


Now we should install Joomla.
To do this, go to the browser’s url address of our future site. In our case it is http://dev3.tonytemplates.com/www/Computer_repair_Joomla3.1/. We will be redirected to the Joomla installation web page.
We should leave all the default settings except for one. On step “Database configuration” set value “jos_” for field “Table Prefix”.
Now we have the default Joomla theme installed.
After that we will install the “Computer Repair” website template.
For this we need the contents of the folder “Template Source”, which is located in the zip archive of the template. Upload it to the server with the choice of “overwrite” option.


On the next step we have to make the database import.
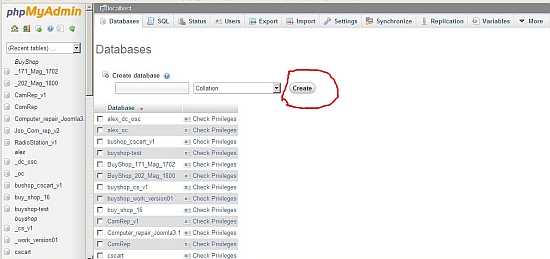
In our case, for this operation we go at the address http://dev3.tonytemplates.com/phpmyadmin
Create the database with the website’s name. In our case – Computer_repair_Joomla3.1

Create a new user in the tab “Privilege”.


After switching to the tab “Import”, select a file “sql”- “dump.sql”, which is situated in the site template’s archive, and execute the import.


After the procedure is finished, the message of the database successful import will appear.
Ok. This is all the procedures for installing the template. Now you can admire the finished site.


If you already have Joomla installed, before the installation of the “Computer Repair” template’s files, you should upload the content of the folder “Template Source” to your server. You have also to make import of the file “dump.sql”
Ok, that’s all for today. In the following articles we will talk about how to perform customization of the product.
See you in the next posts.
Tonytemplates team
Hi colleagues, how is the whole thing, and what you desire
to say on the topic of this piece of writing, in my view its really amazing designed for me.
am speechless. It is a unbelievable weblog and very partaking too. Great work! That’s probably not a lot coming from an beginner blogger like me, but it’s all I may assume after having fun with your posts. Nice grammar and vocabulary. Not like different blogs. You actually know what you are speaking about too. So much that you made me want to learn more. Your blog has turn into a stepping stone for me, my fellow blogger. Thank you for the detailed journey. I actually enjoyed the 6 posts that I have learned so